#Amazon clone source code
Explore tagged Tumblr posts
Visit Tumblr Blog
Explore Tumblr blogs with no restrictions, modern design and the best experience.
Last Seen Tumblr Blogs


Fun Fact
Total funding amounts to $125.3M.
Text
How to Build a YouTube Clone App: Tech Stack, Features & Cost Explained
Ever scrolled through YouTube and thought, “I could build this—but better”? You’re not alone. With the explosive growth of content creators and the non-stop demand for video content, building your own YouTube clone isn’t just a dream—it’s a solid business move. Whether you're targeting niche creators, regional content, or building the next big video sharing and streaming platform, there’s room in the market for innovation.
But before you dive into code or hire a dev team, let’s talk about the how. What tech stack powers a platform like YouTube? What features are must-haves? And how much does it actually cost to build something this ambitious?
In this post, we’re breaking it all down—no fluff, no filler. Just a clear roadmap to building a killer YouTube-style platform with insights from the clone app experts at Miracuves.
Core Features of a YouTube Clone App
Before picking servers or coding frameworks, you need a feature checklist. Here’s what every modern YouTube clone needs to include:
1. User Registration & Profiles
Users must be able to sign up via email or social logins. Profiles should allow for customization, channel creation, and subscriber tracking.
2. Video Upload & Encoding
Users upload video files that are auto-encoded to multiple resolutions (360p, 720p, 1080p). You’ll need a powerful media processor and cloud storage to handle this.
3. Streaming & Playback
The heart of any video platform. Adaptive bitrate streaming ensures smooth playback regardless of network speed.
4. Content Feed & Recommendations
Dynamic feeds based on trending videos, subscriptions, or AI-driven interests. The better your feed, the longer users stay.
5. Like, Comment, Share & Subscribe
Engagement drives reach. Build these features in early and make them seamless.
6. Search & Filters
Let users find content via keywords, categories, uploaders, and tags.
7. Monetization Features
Allow ads, tipping (like Super Chat), or paid content access. This is where the money lives.
8. Admin Dashboard
Moderation tools, user management, analytics, and content flagging are essential for long-term growth.
Optional Features:
Live Streaming
Playlists
Stories or Shorts
Video Premiere Countdown
Multilingual Subtitles
Media Suggestion: Feature comparison table between YouTube and your envisioned clone
Recommended Tech Stack
The tech behind YouTube is serious business, but you don’t need Google’s budget to launch a lean, high-performance YouTube clone. Here’s what we recommend at Miracuves:
Frontend (User Interface)
React.js or Vue.js – Fast rendering and reusable components
Tailwind CSS or Bootstrap – For modern, responsive UI
Next.js – Great for server-side rendering and SEO
Backend (Server-side)
Node.js with Express – Lightweight and scalable
Python/Django – Excellent for content recommendation algorithms
Laravel (PHP) – If you're going for quick setup and simplicity
Video Processing & Streaming
FFmpeg – Open-source video encoding and processing
HLS/DASH Protocols – For adaptive streaming
AWS MediaConvert or Mux – For advanced media workflows
Cloudflare Stream – Built-in CDN and encoding, fast global delivery
Storage & Database
Amazon S3 or Google Cloud Storage – For storing video content
MongoDB or PostgreSQL – For structured user and video data
Authentication & Security
JWT (JSON Web Tokens) for secure session management
OAuth 2.0 for social logins
Two-Factor Authentication (2FA) for creators and admins
Analytics & Search
Elasticsearch – Fast, scalable search
Mixpanel / Google Analytics – Track video watch time, drop-offs, engagement
AI-based recommendation engine – Python + TensorFlow or third-party API
Media Suggestion: Architecture diagram showing tech stack components and flow
Development Timeline & Team Composition
Depending on complexity, here’s a typical development breakdown:
MVP Build: 3–4 months
Full Product with Monetization: 6–8 months
Team Needed:
1–2 Frontend Developers
1 Backend Developer
1 DevOps/Cloud Engineer
1 UI/UX Designer
1 QA Tester
1 Project Manager
Want to move faster? Miracuves offers pre-built YouTube clone app solutions that can cut launch time in half.
Estimated Cost Breakdown
Here’s a rough ballpark for custom development: PhaseEstimated CostUI/UX Design$3,000 – $5,000Frontend Development$6,000 – $10,000Backend Development$8,000 – $12,000Video Processing Setup$4,000 – $6,000QA & Testing$2,000 – $4,000Cloud Infrastructure$500 – $2,000/month (post-launch)
Total Estimated Cost: $25,000 – $40,000+ depending on features and scale
Need it cheaper? Go the smart way with a customizable YouTube clone from Miracuves—less risk, faster time-to-market, and scalable from day one.
Final Thoughts
Building a YouTube clone isn’t just about copying features—it’s about creating a platform that gives creators and viewers something fresh, intuitive, and monetizable. With the right tech stack, must-have features, and a clear plan, you’re not just chasing YouTube—you’re building your own lane in the massive video sharing and streaming platform space.
At Miracuves, we help startups launch video platforms that are secure, scalable, and streaming-ready from day one. Want to build a revenue-generating video app that users love? Let’s talk.
FAQs
How much does it cost to build a YouTube clone?
Expect $25,000–$40,000 for a custom build. Ready-made solutions from Miracuves can reduce costs significantly.
Can I monetize my YouTube clone?
Absolutely. Use ads, subscriptions, tipping, pay-per-view, or affiliate integrations.
What’s the hardest part of building a video streaming app?
Video encoding, storage costs, and scaling playback across geographies. You’ll need a solid cloud setup.
Do I need to build everything from scratch?
No. Using a YouTube clone script from Miracuves saves time and still offers full customization.
How long does it take to launch?
A simple MVP may take 3–4 months. A full-feature platform can take 6–8 months. Miracuves can cut that timeline in half.
Is it legal to build a YouTube clone?
Yes, as long as you’re not copying YouTube’s trademark or copyrighted content. The tech and business model are fair game.
1 note
·
View note
Text
Insta News AI Review – Instantly Create AI-Updated News Sites That Make Us $500+ Daily
Welcome to my Insta News AI Review. The world of news consumption has changed so much with news consumers seeking real time updates on their fingers. With the release of Insta News AI we have a game changer in this domain because Insta News AI will create AI powered, auto updating news sites in less than 60 seconds.

Insta News AI promises its users that they can now revolutionize the way people and businesses curate and monetize news content, by making use of what is offered by the renowned platforms including CNN, BBC and Fox News. In this comprehensive review, I will take you through how Insta News AI works, its features, its benefits, the possible potential downsides and the reasons why you should always consider using it if you ever want to take over the online news niche.
What Is Insta News AI?
Insta News AI app is an AI-based tool that incorporates the latest AI technology to build and run completely automated news sites. The app pulls breaking feed from big news sources such as CNN, BBC, Fox News among others in real time so your site has content updated always.

This tool helps you to avoid the need to update it manually each month, search for hours, or hire a team of content writers. If you are a digital marketer, affiliate marketer, or content publisher, then you’ll have the perfect tool to take over the news niche with Insta News AI.
Insta News AI Review: Overview
Product Creator: Yogesh Agarwal
Product Name: Insta News AI
Launch Date: 2024-Nov-15
Launch Time: 11:00 EST
Front-End Price: $17 (One-time payment)
Official Website: Click Here To Visit Official Salespage
Product Type: Tools and Software
Support: Effective Response
Discount: Get The Best Discount Right Here!
Recommended: Highly Recommended
Bonuses: YES, Huge Bonuses
Skill Level Required: All Levels
Discount Coupon: Use Code “ADMINCOUINA” To Get $4 OFF!
Refund: YES, 30 Days Money-Back Guarantee
Insta News AI Review: About Authors

Yogesh Agarwal and his passion for cutting-edge solutions have changed how marketers interact with their audiences. Yogesh, the founder of Insta News AI, created the first AI-powered virtual platform generation tool to let marketers easily generate compelling news websites platform. Yogesh’s platform lets marketers of diverse backgrounds use virtual influencers. His AI knowledge allows him to create easy solutions that require no technical skills, making content creation accessible to everybody.
Some lots of launches, including Logo Animyze, Vocal Vibes AI, TubeQuiz AI, AI Face Fusion, Vocal Clone AI, AI Ebook Suite, Instant AI Biz, AI Fame Rush, AI Platform Creator, VidMonopoly, AI Creative Suite, AI Audio Avataar, Ai Video Tales, BusinessBoxAI, AI Creative Suite, and many others.
Insta News AI Review: Key Features of Insta News AI
InstaNewsAI AI App: Full and unrestricted access to our ground-breaking Insta News AI app… That will allow you to create and publish profitable AI news sites
InstaNewsAI AI Translator: Dominate the global market with Insta News AI, with our AI translator that will give you 99% accuracy. Create and publish AI news sites in any language you want
InstaNewsAI AI Monetizer: Access 16+ monetization methods with Insta News AI Instantly integrate with Google ads, Amazon affiliate program, Banner ads, and tons more
Insta News AI AI SEO Optimization: With 1-click publish SEO-Optimized sites that will guarantee #1 in Google And enjoy endless traffic
Insta News AI AI Automation: With Insta News AI, you don’t need to do any manual work, just sit back and relax. While Insta News AI do all the work for you.
Insta News AI AI Commissions: Enjoy passive and automatic commissions with Insta News AI Sell anything you want with just 1 click.
1000+ DFY Templates: Unlock 1000+ stunning templates that you can customize with just a few clicks with no coding or designs.
DFY AI News Sites: Access DFY AI news sites that are ready for you to profit from No work, no setup.
Insta News AI Mobile Edition: This will allow you to also operate Insta News AI, even from your mobile phone whether it’s an Android, iPhone, or tablet, it will work.
Training videos: There is NOTHING missing in this training everything you need to know is explained in IMMENSE details.
World-class support: Have a question? Just reach out to us and our team will do their best to fix your problem in no time
Insta News AI Review: How Does It Work?
You can create AI news sites in any niche and sell them for $997 in 3 clicks.
Step #1: Enter
Enter a keyword or select a niche you like from our intuitive dashboard. It can be (Fashion, Tech, Sports, Politics, or anything you like).
Step #2: Publish
Insta News AI’s AI will create DFY AI-updated news site for you, and allow you to customize it to your liking with its powerful AI drag-n-drop features No Experience Needed.
Step #3: Profit
Yup that’s it Now watch thousands of clicks come to your newly created AI news sites and enjoy a passive income stream from ads, ClickBank, JVzoo, Digistore, or anything else. (Or you can even sell the website for a quick $997 payday.
Insta News AI Review: Benefits of Insta News AI
Instantly Create AI-Updated News Sites Without You Doing Any Manual Work Whatsoever
Automatically Update Your News Sites From Top Platforms Like (CNN, FoxNews, BBC, And Many More)
Sell Your News Sites On Flippa, NicheFlipper, Facebook, And Other… For An Easy $997 Payday
Just Enter A Keyword, And You’re Done Insta News AI Will Take Care Of The Rest
Finally, Leverage A $35.2 Billion Industry With Insta News AI
With ZERO Experience, Create Professional AI News Sites In Seconds
Even If You Never Made A Penny Online Before InstaNewsAI Will Work For You
Insta News AI Create SEO-Optimized News Sites, Guaranteed To Rank #1 In Google News
Unlock Thousands Of Targeted Clicks Every Single Day, With Insta News AI
Clients From All Over The World Begs Us To Pay Us $997 For An AI News Site
The Demand For AI News Sites Is Unprecedented
No Waiting – Create & Sell Your First AI News Sites Within Seconds Of Joining Insta News AI
Leverage Our Proven-Viral Templates To Create Your DFY AI News Sites…
Experience The Limitless Traffic With Insta News AI Without Paying For Ads Or Doing SEO
No Need To Write, Code, Design Anything, Insta News AI AI Do All The Work For You
Create Responsive AI News Sites in Any Niche You Want (Sports, Fashion, Technology, Politics, or Anything Else)
Promote Any Offer You Want From ClickBank, JVzoo, WarriorPlus, Or Even Your Services On Your News Sites
ZERO Configuration Or Setup Required, Insta News AI Works Out Of The Box
Doesn’t Matter Where You Are From, Insta News AI Works Worldwide, And In Any Language
Ultra-Fast SSD Hosting For Your News Sites to Guarantee MAXIMUM Page Speed
Act Now And Unlock Our DFY AI News Sites That Make Us $500+ Daily
With One Click, List Your Website On Flippa, Facebook, NicheFlipper, And More
Insta News AI Creates Responsive Sites That Work Perfectly On Any Device
Try It On Our Dime, Try Insta News AI Risk-Free For 30 Days
Verify Users Say About Insta News AI

Insta News AI Review: Who Should Use It?
Freelancers
Affiliate Marketers
Coaches and Consultants
Marketing Agencies
Entrepreneurs
Content Creators
eCommerce Store Owners
Digital Marketers
Consulting Firms
Children’s Event Planner
Influencers
Social Media Marketer
Bloggers
Digital Agencies
And Many Others
Insta News AI Review: OTO’s And Pricing
Frоnt Еnԁ Price: Insta News AI ($17)
OTO1: Unlimited Edition ($37)
OTO2: Automation Edition ($47)
OTO3: DFY (Done-For-You) Edition ($67)
OTO4: One-Click Traffic ($97)
OTO5: Agency Edition ($97)
OTO6: Reseller Edition ($147)
OTO7: Click Design Edition ($97)
OTO8: ChatGPT Edition ($37)
Insta News AI Review: Money Back Guarantee
Our 30 Days Iron Clad Money Back Guarantee
We trust our app blindly. That is after a one year usage by us and others we can be certain that it does work. But I also know that you could be skeptical because you don’t really know me very well. And I understand that. Everyone should be a little sceptical every now and then. But I can help.
Here is the deal: Access Insta News AI now. Apply it and fully enjoy all the facilities it provides for you. However, if for any reason, you think Instagram News AI is nonbeneficial, you only need to write a message to the customer service team that works around the clock. Plus, we will return every single penny you give us back to you. No questions asked.
Insta News AI Review: Pros and Cons
Pros:
Speed: Rapid deployment of websites.
Reliability: Selected from trusted global sources.
Monetization: Various revenue generating features.
SEO-Ready: Optimized for search engines.
Ease of Use: Works for all skill levels.
Cons:
Requires a one-time investment
To use this product, you must have internet access.
Nothing wrong with it, it works perfectly!
My Own Customized Exclusive VIP Bonus Bundle
***How To Claim These Bonuses***
Step #1:
Complete your purchase of the Insta News AI: My Special Unique Bonus Bundle will be visible on your access page as an Affiliate Bonus Button on WarriorPlus immediately after purchase. And before ending my honest Insta News AI Review, I told you that I would give you my very own unique PFTSES formula for Free.

Step #2:
Send the proof of purchase to my e-mail “[email protected]” (Then I’ll manually Deliver it for you in 24 HOURS).
Insta News AI Free Premium Bonuses

Frequently Asked Questions (FAQ’s)
Q. Do I need any experience to get started?
None, all you need is just an internet connection. And you’re good to go.
Q. How long does it take to make money?
Our average member made their first sale the same day they got access to Insta News AI.
Q. What if I failed?
While that is unlikely, we removed all the risk for you. If you tried Newsly and failed, we will refund you every cent you paid.
Q. Is there any monthly cost?
Depends, If you act now, NONE. But if you wait, you might end up paying $397/mo Do I need to purchase anything else for it to work?
Q. Do I need to purchase anything else for it to work?
Nop, Insta News AI is the complete thing. You get everything you need to make it work. Nothing is left behind.
Q. How can I get started?
Awesome, I like your excitement, all you have to do is click any of the buy buttons on the page and secure your copy of Newsly at a one-time fee.
My Recommendation
Insta News AI is a magical tool in the news automation industry. The ability to deploy AI enhanced news websites in less than 60 seconds and with real time feeds of trusted sources make it a very valuable instrument for digital marketers, entrepreneurs and news buff.
Obviously, there are some limitations, such as an initial investment, and the constraints of customization, but all things considered, all these much outweigh the disadvantages. Insta News AI is a powerful, efficient, scalable solution for anyone wanting to enter the news website niche or sharpen their content strategy.
<<>> CLICK HERE TO GET INSTANT ACCESS NOW <<>>
Check Out My Previous Reviews: AI Video News Maker Review, AI Commission PRO Review, MailMaigicAi Review, Talking KidsBooks Review, and AI Profit Machine Review.
Thank for reading my Insta News AI Review till the end. Hope it will help you to make purchase decision perfectly
#instnewsai#instnewsaireview#instnewsaifeatures#instnewsaiworks#instnewsaidiscount#instnewsaife#instnewsaioto#instnewsaibonus#howtoinstnewsaiworks#instnewsaisoftware#instnewsaifunnels#instnewsaiupsell#instnewsaiworth#instnewsaidemo#ai#software#traffic#aiapp#aitool#artificalintelligence#passiveincome#financialfreedom#AllInOneApp#AiApps
0 notes
Text

Develop your own fashion empire with the help of Amazon Clone App
The ecommerce industry is now yours to rule with this Amazon clone app on your side. With advanced features like multi-currency integration, advanced search bar and AR view, this app is destined for greatness for your business ideas. Get it from us today for skyrocketing your ecommerce business scopes.
Read More, https://www.appdupe.com/amazon-clone
#Amazon like app development#Best Amazon clone script#Amazon clone source code#amazon clone android#Stellar Ecommerce App Solution
1 note
·
View note
Text
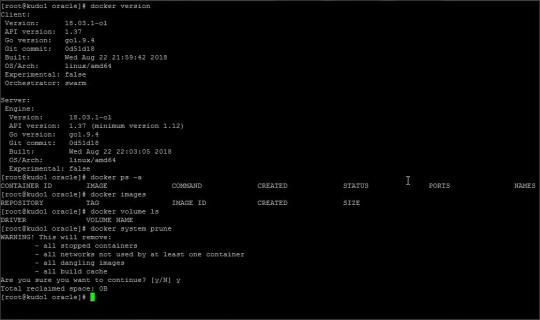
Rhel Docker

Rhel Docker
Rhel Docker Ce
Rhel Docker
Rhel Docker Ce
The Remote - Containers extension lets you use a Docker container as a full-featured development environment. Whether you deploy to containers or not, containers make a great development environment because you can:
Develop with a consistent, easily reproducible toolchain on the same operating system you deploy to.
Quickly swap between different, isolated development environments and safely make updates without worrying about impacting your local machine.
Make it easy for new team members / contributors to get up and running in a consistent development environment.
Try out new technologies or clone a copy of a code base without impacting your local setup.
Rhel Docker
Rhel Docker Ce
The extension starts (or attaches to) a development container running a well defined tool and runtime stack. Workspace files can be mounted into the container from the local file system, or copied or cloned into it once the container is running. Extensions are installed and run inside the container where they have full access to the tools, platform, and file system.
Rhel Docker
Amazon Web Services (AWS) and Red Hat provide a complete, enterprise-class computing environment. Red Hat solutions on AWS give customers the ability to run enterprise traditional on-premises applications, such as SAP, Oracle databases, and custom applications in the cloud.
Windows 10 Home (2004+) requires Docker Desktop 2.2+ and the WSL2 back-end. (Docker Toolbox is not supported.) macOS: Docker Desktop 2.0+. Linux: Docker CE/EE 18.06+ and Docker Compose 1.21+. (The Ubuntu snap package is not supported.) Containers: x8664 / ARMv7l (AArch32) / ARMv8l (AArch64) Debian 9+, Ubuntu 16.04+, CentOS / RHEL 7+ x8664.
Docker volumes allow you to back up, restore, and migrate data easily. This tutorial explains what a Docker volume is and how to use it, as well as how to mount a volume in Docker.
Amazon Web Services (AWS) and Red Hat provide a complete, enterprise-class computing environment. Red Hat solutions on AWS give customers the ability to run enterprise traditional on-premises applications, such as SAP, Oracle databases, and custom applications in the cloud.
You then work with VS Code as if everything were running locally on your machine, except now they are isolated inside a container.
System Requirements
Local:
Windows:Docker Desktop 2.0+ on Windows 10 Pro/Enterprise. Windows 10 Home (2004+) requires Docker Desktop 2.2+ and the WSL2 back-end. (Docker Toolbox is not supported.)
macOS: Docker Desktop 2.0+.
Linux: Docker CE/EE 18.06+ and Docker Compose 1.21+. (The Ubuntu snap package is not supported.)
Containers:
x86_64 / ARMv7l (AArch32) / ARMv8l (AArch64) Debian 9+, Ubuntu 16.04+, CentOS / RHEL 7+
x86_64 Alpine Linux 3.9+
Other glibc based Linux containers may work if they have needed prerequisites.
While ARMv7l (AArch32), ARMv8l (AArch64), and musl based Alpine Linux support is available, some extensions installed on these devices may not work due to the use of glibc or x86 compiled native code in the extension. See the Remote Development with Linux article for details.
Note that while the Docker CLI is required, the Docker daemon/service does not need to be running locally if you are using a remote Docker host.
Installation
To get started, follow these steps:
Install VS Code or VS Code Insiders and this extension.
Install and configure Docker for your operating system.
Windows / macOS:
Install Docker Desktop for Mac/Windows.
If not using WSL2 on Windows, right-click on the Docker task bar item, select Settings / Preferences and update Resources > File Sharing with any locations your source code is kept. See tips and tricks for troubleshooting.
To enable the Windows WSL2 back-end: Right-click on the Docker taskbar item and select Settings. Check Use the WSL2 based engine and verify your distribution is enabled under Resources > WSL Integration.
Linux:
Follow the official install instructions for Docker CE/EE. If you use Docker Compose, follow the Docker Compose install directions.
Add your user to the docker group by using a terminal to run: sudo usermod -aG docker $USER Sign out and back in again so this setting takes effect.
Rhel Docker Ce
Working with Git? Here are two tips to consider:
If you are working with the same repository folder in a container and Windows, be sure to set up consistent line endings. See tips and tricks to learn how.
If you clone using a Git credential manager, your container should already have access to your credentials! If you use SSH keys, you can also opt-in to sharing them. See Sharing Git credentials with your container for details.
Getting started
Follow the step-by-step tutorial or if you are comfortable with Docker, follow these four steps:
Follow the installation steps above.
Clone https://github.com/Microsoft/vscode-remote-try-node locally.
Start VS Code
Run the Remote-Containers: Open Folder in Container... command and select the local folder.
Check out the repository README for things to try. Next, learn how you can:
Use a container as your full-time environment - Open an existing folder in a container for use as your full-time development environment in few easy steps. Works with both container and non-container deployed projects.
Attach to a running container - Attach to a running container for quick edits, debugging, and triaging.
Advanced: Use a remote Docker host - Once you know the basics, learn how to use a remote Docker host if needed.
Available commands
Another way to learn what you can do with the extension is to browse the commands it provides. Press F1 to bring up the Command Palette and type in Remote-Containers for a full list of commands.
You can also click on the Remote 'Quick Access' status bar item to get a list of the most common commands.
For more information, please see the extension documentation.
Release Notes
While an optional install, this extension releases with VS Code. VS Code release notes include a summary of changes to all three Remote Development extensions with a link to detailed release notes.
As with VS Code itself, the extensions update during a development iteration with changes that are only available in VS Code Insiders Edition.
Questions, Feedback, Contributing
Have a question or feedback?
See the documentation or the troubleshooting guide.
Up-vote a feature or request a new one, search existing issues, or report a problem.
Contribute a development container definition for others to use
Contribute to our documentation
...and more. See our CONTRIBUTING guide for details.
Or connect with the community...
Telemetry
Visual Studio Code Remote - Containers and related extensions collect telemetry data to help us build a better experience working remotely from VS Code. We only collect data on which commands are executed. We do not collect any information about image names, paths, etc. The extension respects the telemetry.enableTelemetry setting which you can learn more about in the Visual Studio Code FAQ.
License
By downloading and using the Visual Studio Remote - Containers extension and its related components, you agree to the product license terms and privacy statement.
2 notes
·
View notes
Text
Which Is The Best PostgreSQL GUI? 2021 Comparison
PostgreSQL graphical user interface (GUI) tools help open source database users to manage, manipulate, and visualize their data. In this post, we discuss the top 6 GUI tools for administering your PostgreSQL hosting deployments. PostgreSQL is the fourth most popular database management system in the world, and heavily used in all sizes of applications from small to large. The traditional method to work with databases is using the command-line interface (CLI) tool, however, this interface presents a number of issues:
It requires a big learning curve to get the best out of the DBMS.
Console display may not be something of your liking, and it only gives very little information at a time.
It is difficult to browse databases and tables, check indexes, and monitor databases through the console.
Many still prefer CLIs over GUIs, but this set is ever so shrinking. I believe anyone who comes into programming after 2010 will tell you GUI tools increase their productivity over a CLI solution.
Why Use a GUI Tool?
Now that we understand the issues users face with the CLI, let’s take a look at the advantages of using a PostgreSQL GUI:
Shortcut keys make it easier to use, and much easier to learn for new users.
Offers great visualization to help you interpret your data.
You can remotely access and navigate another database server.
The window-based interface makes it much easier to manage your PostgreSQL data.
Easier access to files, features, and the operating system.
So, bottom line, GUI tools make PostgreSQL developers’ lives easier.
Top PostgreSQL GUI Tools
Today I will tell you about the 6 best PostgreSQL GUI tools. If you want a quick overview of this article, feel free to check out our infographic at the end of this post. Let’s start with the first and most popular one.
1. pgAdmin
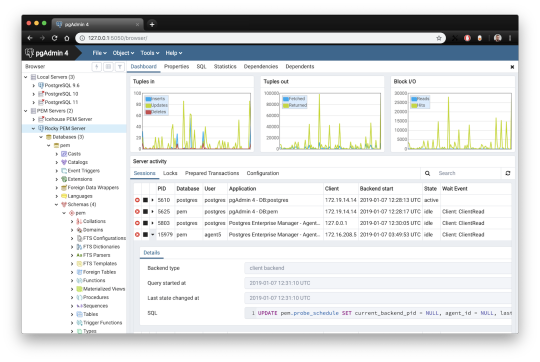
pgAdmin is the de facto GUI tool for PostgreSQL, and the first tool anyone would use for PostgreSQL. It supports all PostgreSQL operations and features while being free and open source. pgAdmin is used by both novice and seasoned DBAs and developers for database administration.
Here are some of the top reasons why PostgreSQL users love pgAdmin:
Create, view and edit on all common PostgreSQL objects.
Offers a graphical query planning tool with color syntax highlighting.
The dashboard lets you monitor server activities such as database locks, connected sessions, and prepared transactions.
Since pgAdmin is a web application, you can deploy it on any server and access it remotely.
pgAdmin UI consists of detachable panels that you can arrange according to your likings.
Provides a procedural language debugger to help you debug your code.
pgAdmin has a portable version which can help you easily move your data between machines.
There are several cons of pgAdmin that users have generally complained about:
The UI is slow and non-intuitive compared to paid GUI tools.
pgAdmin uses too many resources.
pgAdmin can be used on Windows, Linux, and Mac OS. We listed it first as it’s the most used GUI tool for PostgreSQL, and the only native PostgreSQL GUI tool in our list. As it’s dedicated exclusively to PostgreSQL, you can expect it to update with the latest features of each version. pgAdmin can be downloaded from their official website.
pgAdmin Pricing: Free (open source)
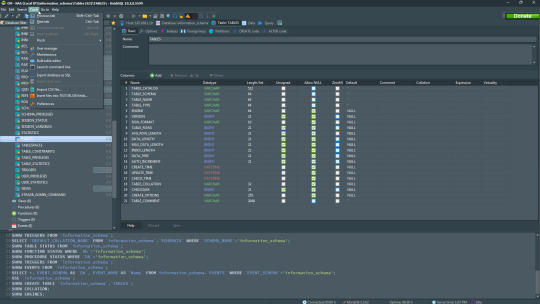
2. DBeaver

DBeaver is a major cross-platform GUI tool for PostgreSQL that both developers and database administrators love. DBeaver is not a native GUI tool for PostgreSQL, as it supports all the popular databases like MySQL, MariaDB, Sybase, SQLite, Oracle, SQL Server, DB2, MS Access, Firebird, Teradata, Apache Hive, Phoenix, Presto, and Derby – any database which has a JDBC driver (over 80 databases!).
Here are some of the top DBeaver GUI features for PostgreSQL:
Visual Query builder helps you to construct complex SQL queries without actual knowledge of SQL.
It has one of the best editors – multiple data views are available to support a variety of user needs.
Convenient navigation among data.
In DBeaver, you can generate fake data that looks like real data allowing you to test your systems.
Full-text data search against all chosen tables/views with search results shown as filtered tables/views.
Metadata search among rows in database system tables.
Import and export data with many file formats such as CSV, HTML, XML, JSON, XLS, XLSX.
Provides advanced security for your databases by storing passwords in secured storage protected by a master password.
Automatically generated ER diagrams for a database/schema.
Enterprise Edition provides a special online support system.
One of the cons of DBeaver is it may be slow when dealing with large data sets compared to some expensive GUI tools like Navicat and DataGrip.
You can run DBeaver on Windows, Linux, and macOS, and easily connect DBeaver PostgreSQL with or without SSL. It has a free open-source edition as well an enterprise edition. You can buy the standard license for enterprise edition at $199, or by subscription at $19/month. The free version is good enough for most companies, as many of the DBeaver users will tell you the free edition is better than pgAdmin.
DBeaver Pricing
: Free community, $199 standard license
3. OmniDB
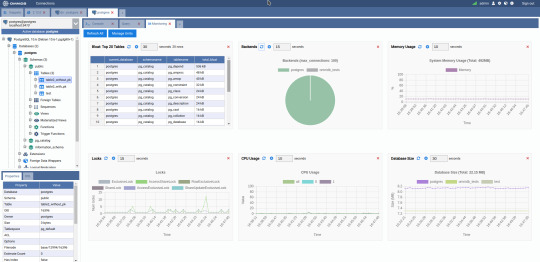
The next PostgreSQL GUI we’re going to review is OmniDB. OmniDB lets you add, edit, and manage data and all other necessary features in a unified workspace. Although OmniDB supports other database systems like MySQL, Oracle, and MariaDB, their primary target is PostgreSQL. This open source tool is mainly sponsored by 2ndQuadrant. OmniDB supports all three major platforms, namely Windows, Linux, and Mac OS X.
There are many reasons why you should use OmniDB for your Postgres developments:
You can easily configure it by adding and removing connections, and leverage encrypted connections when remote connections are necessary.
Smart SQL editor helps you to write SQL codes through autocomplete and syntax highlighting features.
Add-on support available for debugging capabilities to PostgreSQL functions and procedures.
You can monitor the dashboard from customizable charts that show real-time information about your database.
Query plan visualization helps you find bottlenecks in your SQL queries.
It allows access from multiple computers with encrypted personal information.
Developers can add and share new features via plugins.
There are a couple of cons with OmniDB:
OmniDB lacks community support in comparison to pgAdmin and DBeaver. So, you might find it difficult to learn this tool, and could feel a bit alone when you face an issue.
It doesn’t have as many features as paid GUI tools like Navicat and DataGrip.
OmniDB users have favorable opinions about it, and you can download OmniDB for PostgreSQL from here.
OmniDB Pricing: Free (open source)
4. DataGrip

DataGrip is a cross-platform integrated development environment (IDE) that supports multiple database environments. The most important thing to note about DataGrip is that it’s developed by JetBrains, one of the leading brands for developing IDEs. If you have ever used PhpStorm, IntelliJ IDEA, PyCharm, WebStorm, you won’t need an introduction on how good JetBrains IDEs are.
There are many exciting features to like in the DataGrip PostgreSQL GUI:
The context-sensitive and schema-aware auto-complete feature suggests more relevant code completions.
It has a beautiful and customizable UI along with an intelligent query console that keeps track of all your activities so you won’t lose your work. Moreover, you can easily add, remove, edit, and clone data rows with its powerful editor.
There are many ways to navigate schema between tables, views, and procedures.
It can immediately detect bugs in your code and suggest the best options to fix them.
It has an advanced refactoring process – when you rename a variable or an object, it can resolve all references automatically.
DataGrip is not just a GUI tool for PostgreSQL, but a full-featured IDE that has features like version control systems.
There are a few cons in DataGrip:
The obvious issue is that it’s not native to PostgreSQL, so it lacks PostgreSQL-specific features. For example, it is not easy to debug errors as not all are able to be shown.
Not only DataGrip, but most JetBrains IDEs have a big learning curve making it a bit overwhelming for beginner developers.
It consumes a lot of resources, like RAM, from your system.
DataGrip supports a tremendous list of database management systems, including SQL Server, MySQL, Oracle, SQLite, Azure Database, DB2, H2, MariaDB, Cassandra, HyperSQL, Apache Derby, and many more.
DataGrip supports all three major operating systems, Windows, Linux, and Mac OS. One of the downsides is that JetBrains products are comparatively costly. DataGrip has two different prices for organizations and individuals. DataGrip for Organizations will cost you $19.90/month, or $199 for the first year, $159 for the second year, and $119 for the third year onwards. The individual package will cost you $8.90/month, or $89 for the first year. You can test it out during the free 30 day trial period.
DataGrip Pricing
: $8.90/month to $199/year
5. Navicat

Navicat is an easy-to-use graphical tool that targets both beginner and experienced developers. It supports several database systems such as MySQL, PostgreSQL, and MongoDB. One of the special features of Navicat is its collaboration with cloud databases like Amazon Redshift, Amazon RDS, Amazon Aurora, Microsoft Azure, Google Cloud, Tencent Cloud, Alibaba Cloud, and Huawei Cloud.
Important features of Navicat for Postgres include:
It has a very intuitive and fast UI. You can easily create and edit SQL statements with its visual SQL builder, and the powerful code auto-completion saves you a lot of time and helps you avoid mistakes.
Navicat has a powerful data modeling tool for visualizing database structures, making changes, and designing entire schemas from scratch. You can manipulate almost any database object visually through diagrams.
Navicat can run scheduled jobs and notify you via email when the job is done running.
Navicat is capable of synchronizing different data sources and schemas.
Navicat has an add-on feature (Navicat Cloud) that offers project-based team collaboration.
It establishes secure connections through SSH tunneling and SSL ensuring every connection is secure, stable, and reliable.
You can import and export data to diverse formats like Excel, Access, CSV, and more.
Despite all the good features, there are a few cons that you need to consider before buying Navicat:
The license is locked to a single platform. You need to buy different licenses for PostgreSQL and MySQL. Considering its heavy price, this is a bit difficult for a small company or a freelancer.
It has many features that will take some time for a newbie to get going.
You can use Navicat in Windows, Linux, Mac OS, and iOS environments. The quality of Navicat is endorsed by its world-popular clients, including Apple, Oracle, Google, Microsoft, Facebook, Disney, and Adobe. Navicat comes in three editions called enterprise edition, standard edition, and non-commercial edition. Enterprise edition costs you $14.99/month up to $299 for a perpetual license, the standard edition is $9.99/month up to $199 for a perpetual license, and then the non-commercial edition costs $5.99/month up to $119 for its perpetual license. You can get full price details here, and download the Navicat trial version for 14 days from here.
Navicat Pricing
: $5.99/month up to $299/license
6. HeidiSQL
HeidiSQL is a new addition to our best PostgreSQL GUI tools list in 2021. It is a lightweight, free open source GUI that helps you manage tables, logs and users, edit data, views, procedures and scheduled events, and is continuously enhanced by the active group of contributors. HeidiSQL was initially developed for MySQL, and later added support for MS SQL Server, PostgreSQL, SQLite and MariaDB. Invented in 2002 by Ansgar Becker, HeidiSQL aims to be easy to learn and provide the simplest way to connect to a database, fire queries, and see what’s in a database.
Some of the advantages of HeidiSQL for PostgreSQL include:
Connects to multiple servers in one window.
Generates nice SQL-exports, and allows you to export from one server/database directly to another server/database.
Provides a comfortable grid to browse and edit table data, and perform bulk table edits such as move to database, change engine or ollation.
You can write queries with customizable syntax-highlighting and code-completion.
It has an active community helping to support other users and GUI improvements.
Allows you to find specific text in all tables of all databases on a single server, and optimize repair tables in a batch manner.
Provides a dialog for quick grid/data exports to Excel, HTML, JSON, PHP, even LaTeX.
There are a few cons to HeidiSQL:
Does not offer a procedural language debugger to help you debug your code.
Built for Windows, and currently only supports Windows (which is not a con for our Windors readers!)
HeidiSQL does have a lot of bugs, but the author is very attentive and active in addressing issues.
If HeidiSQL is right for you, you can download it here and follow updates on their GitHub page.
HeidiSQL Pricing: Free (open source)
Conclusion
Let’s summarize our top PostgreSQL GUI comparison. Almost everyone starts PostgreSQL with pgAdmin. It has great community support, and there are a lot of resources to help you if you face an issue. Usually, pgAdmin satisfies the needs of many developers to a great extent and thus, most developers do not look for other GUI tools. That���s why pgAdmin remains to be the most popular GUI tool.
If you are looking for an open source solution that has a better UI and visual editor, then DBeaver and OmniDB are great solutions for you. For users looking for a free lightweight GUI that supports multiple database types, HeidiSQL may be right for you. If you are looking for more features than what’s provided by an open source tool, and you’re ready to pay a good price for it, then Navicat and DataGrip are the best GUI products on the market.
Ready for some PostgreSQL automation?
See how you can get your time back with fully managed PostgreSQL hosting. Pricing starts at just $10/month.
While I believe one of these tools should surely support your requirements, there are other popular GUI tools for PostgreSQL that you might like, including Valentina Studio, Adminer, DB visualizer, and SQL workbench. I hope this article will help you decide which GUI tool suits your needs.
Which Is The Best PostgreSQL GUI? 2019 Comparison
Here are the top PostgreSQL GUI tools covered in our previous 2019 post:
pgAdmin
DBeaver
Navicat
DataGrip
OmniDB
Original source: ScaleGrid Blog
3 notes
·
View notes
Text
Agency Studio {Karthik Ramani} Reviews | Scam Or Does It Really Works?
WHAT IS Agency Studio?
Agency Studio is a cloud-based software that helps you to convert visitors into paying customers with a simple ‘trick’ & offer any agency service to Local businesses. This is absolutely the perfect tool for landing clients and providing them with highly captivating, profit pulling videos that work in any business or niche.
Buy the offer from my link and send me the screenshots on this email ( [email protected]) and I will send you the bonuses
👉 Click Here to buy
Agency Studio Review – FEATURES & BENEFITS.
1. Create/ Customize Buyer Journeys for Unlimited Services
Be it any service that you want to sell you can customize a buyer journey that will land you clients without you having to do any selling! All it takes is a few simple clicks to have this up & running.
2. Offer Variations & Variable Pricing
Offer multiple options to choose from and even provide variable pricing. Offer accurate estimates on-page based on precise customer requirements. If your client’s video is 8 minutes then give them the precise pricing for 8 minutes. Not a minute less or more!
3. Add-ons to increase your cart Value
Easy way to increase your revenue by offering Add-ons and bumps that people will love to pick at the checkout.
4. Display your Media / Style / Colour Themes / Video
Help your potential clients choose the right style of videos or any pattern you want them to choose from. Easy way to understand your client’s requirements and deliver accordingly.
5. Collect Detailed Buyer Requirements
Collect information from buyers by asking them the right questions based on the service you intend to provide. You can get inputs about their business, collect samples, their ideas and even get links of the source files which you need to work with. Perfect way to understand client’s requirement and leave no room for ambiguity!
6. Payment Integration
Hassle-free Payment integrations to collect payments. You can add your paypal, Stripe or Razorpay and collect payments effortlessly. Your Agency will look professional, authentic and will command authority! Also ensures your visitor is converted into a paying customer before they leave the page!
7. Add a FAQ section
Address all possible questions your potential customers may have before picking your service. Best way to keep them interested and seal the deal while they are still on the page.
8. Embed Code / Widget Code to add your service to ANY website
You can easily add the embed code or widget code of your service to any of your Agency websites and see the magic happen. Client-Getting Feature #9
9. Hosted URL for your Service
We also give you a hosted URL for the service you want to offer. You can directly drive traffic to this URL. You can also cName map to have the URL point to your own domain.
10. Included Video Agency Website
We have left no stone unturned. There is also an included Covrr Style Video Agency website which you can start using as your own. No need to create your Agency website from scratch! Infact, I can keep going on and on with the features that we have packed inside Agency Studio that will ensure you keep adding
>> (SPECIAL OFFER) Visit Here to Get Agency Studio For an Exclusive Discounted Price Today

Agency Studio Review- WHO IS Agency Studio INTENDED FOR?
1 Digital Marketers
2 Business owners
3 Beginners
4 Product creators
5 Internet marketers
6 Freelancers
7. Ecom Store Owners
Agency Studio Review– PROS AND CONS
PROS:
I.No need to build websites from scratch
ii. Sell any service effortlessly
iii. No need to have any sales skills
iv. Increase your client conversion rate effortlessly
v. Collect payments hassle-free.
vi. Fulfill orders smoothly
vii. Manage customers & deliver orders with ease
viii. 100% Newbie Friendly to Use Softwares
ix. Get repeat orders
x. One time payment – no monthly Fee
xi. 30 day money back guarantee
CONS:
So far I haven’t found any shortcomings in this software
>> Visit The Official Website Here For Current Discount Deals

Agency Studio REVIEW – Frequently Asked Question
Q.What is included with my purchase today?
A. You get a Turnkey Agency solution using which you can land clients to sell high-paying video services! 1. Client Closing Engine that can Transform any landing page 2. Covrr Studio – To create engaging videos We went a bit crazy when creating this offer. Just the client closing engine or the Covrr Studio is a full tool on its own.
Q. Do I need to have an Agency Website to succeed with Agency Studio?
A. We also provide hosted URL for the services you want to offer but having a website is an added advantage.But thankfully we have included a fully Done-For-You Video Agency website with your purchase. So you’ve nothing to worry about!
Q. If I buy the commercial license – can I sell it to clients?
A. 1. Yes! You can use this to help freelancers & Agencies and clients. 2. You can also create unlimited videos for your clients and sell them for profits!
Q. Is this One Time Fee the Only Fee?
A. Yes, if you buy it right now you only pay a one-time fee during this launch period. We will start selling this at a recurring price in the future.
Q. What if I already own Covrr Studio?
A. Awesome! We have a special deal for you to get the Agency Studio upgrade plus all the new templates & training we have in the upsell. Get in touch with our support desk and they will give you a special link to purchase. This is ONLY if you own Covrr Studio already!
Q. How does this compare to other Agency tools?
A. Firstly, there is no other Agency solution that compares to Agency Studio! It is the first and only solution that combines a high-paying video service that you can offer along with a client-getting engine. If you are asking about the video tool part, it is loaded with a ton of first to market features.. So we don’t have any competition when it comes to incredible video wrapping technology, progress bars, countdown times, and automated captions!
Q. Will this platform be supported over the years?
A. Yes. Agency Studio has been developed by Karthik Ramani’s team that has created amazing products over the last 15 years. Some of them are Everlesson, Extempore, Skilexa, Marketpresso & many more. You will see consistent upgrades happening over the years for Covrr Studio. Heck, we have planned some amazing updates right after you join the platform. All in all, you are in safe hands. Get started right away!
Q. Can I upload videos of any length?
A. Yes! You are free to upload 1 minute video or even a 30 minute video. Make sure the file size is 300MB or less for us to add the Covrr Studio Magic.
Q. Is there any usage restriction for the automated transcriptions?
A. No, there isn’t any restriction on the usage. We use our own internal captioning model which has 85% accuracy. You also have the option of putting your Amazon Transcribe API key and have 95% accuracy. For most of the people a free tier from Amazon would be more than sufficient.
(SPECIAL SAVINGS - 50% OFF) Click Here To Order Agency Studio at a Discounted Price Today

Agency Studio REVIEW – PRICE AND EVALUATION
Front End: Agency Studio($42)
Let me recap what you will get inside Agency Studio
Agency Studio – Client management portal
Create Project
Create Service/Product
Client Order Management Dashboard (Live, Completed and Cancelled )
Embed code provision for created service/ Product
Widget code provision for service and product
Agency Website for video service
Hosted URL for the created service/product
Ability to add FAQ for the created service/Product
Ability to add branding logo for the project
Ability to add retargeting codes
Customer Management Dashboard
Export Customer as csv file
Ability to add buyer email notification.
Ability to add order delivery email notification.C
name Mapping Provision for Own Branding
Payment Integrations – Paypal, Stripe, Razorpay
Autoresponder Integrations
SMTP Integrations
For a limited time, you can grab Agency Studio with early bird discount price of $42, ONLY in the selected options below . Pick the option that you think will compliment your unique business needs, but hurry because the offer price wont last forever.
Agency Studio is available for a low one-time price for a short period only. Make sure you act before the prices rise. The price will keep on increasing every hour.

All 3 Agency Studio OTO/Upgrades INFO Given Below
OTO 1: MY AGENCY PROFESSIONAL ($57 – $67)>>More Details<<
Let me recap what you will get inside
i. Convert your video in multiple layouts in 1 click
ii. Unlimited custom font uploads
iii. Create your own Template
iv. Upload own trascription file
v. Download caption to use in Website/blog
vi. Clone Campaigns
vii. Additional Pro Templates
viii. Upload your own Mov file for Wrapper
ix. Collaborate with upto 10 Team Members
x. Virtual AssistantsAssign specific projects to Team members
xi. Monitor Status of all Projects
xii. 200 high-converting Wrapper text
xiii. Captions from Videos with million of Views
xiv. Priority RenderingDirectly Share on Social Media
xv. 10 DFY Social Media Ads to sell your Services
xvi. DFY Fiverr Gigs
xvii. High-converting Email Swipes
xviii. Cold-calling Script
xix Client Presentation
xx. Contract Document
OTO 2: AGENCY STUDIO – TEMPLATE CLUB ($27 – $47)>>More Details<<
Let me recap what you will get inside
i. 25 Facebook Ad Video Templates
ii. 25 Instagram
iii. Facebook Story video Templates
iv. 25 E-commerce Video Templates
v. 25 Meme Video Templates
vi. 25 YouTube Video Templates
vii. 25 Facebook Post Video Templates
viii. 100 Local Business Video Templates
ix. 20 New Templates Every month for 12 months
x. 5 Custom Template Request
xi. Share Template Feature to sell your Templates to other Agency Studio Users
xii. Exclusive Facebook Group for Template Club Members
xiii. Access to list your Templates in Template Marketplace for selling to other users
OTO 3: AGENCY STUDIO – RESELLER>>More Details<<
Let me recap what you will get inside
i. Sell 100 Agency Studio (FE + Pro) access ($147)
ii. Sell 250 Agency Studio (FE + Pro) access ($247)
Agency Studio Review-Conclusion
Hopefully, with my honest thoughts about Agency Studio,I really hope it did help you with your buying decision. I understand the decision of taking out $34 one time price is not simply made but this investment is profitable and for a sustainable business.
Note:
After purchasing Agency Studio through our website, just contact us here & we will send your bonuses, thanks:)
OR
You can also check bonuses inside your JVzoo purchase section, we have already added them here.
1 note
·
View note
Text
Hire me under false pretences, then fire me under more fallacies? Welp; OK then
First post; TL;DR at the end
Background.init()
After leaving 6th form (college for my family over the pond), I started a job as a Full Stack Java Developer for a small company in the city I currently reside, study and work (more on that later). For those not in the know, a "Full Stack" Developer, is someone that develops the application/website that controls an application, the middleware "brain", and the back-end, usually a Database of some kind.
In the contract, it stated that "All development projects developed within Notarealcompany's offices are the sole property of the company". I was new to the scene and assumed this was the norm (turns out it is - Important later).
The Story.main()
My "Training" was minimalistic, and expectations were insanely high. I was placed on a client project within the first month, and was told that this was to be a trial by fire. Oh boy.
Having spoken to the client, their expectations had already been set by the owner; let's call him Berk (Berk is an English term for moron); "Whatever you need, our developers can accommodate". Their requirements were as follows;
The Intranet software MUST match the production, public site in functionality, including JQuery and other technologies I was unfamiliar with
MUST accommodate their inventory and shipping database, including prior version functionality (which included loading a 400k+ database table into a webpage in one shot)
MUST look seamless on ALL internal assets, regardless of browser (THIS is important)
ABSOLUTELY MUST USE THE STRONGEST SECURITY MONEY CAN BUY (without requiring external sources)
Having asked what the oldest machine on their network was, I realised it was a nightmare given form. They wanted advanced webtoys to work on WINDOWS XP SP1 (which did not, and does not, support HTML5, let alone the version of JavaScript/JQuery the main website does).
I was given a time-line of 2 months to build this by the client, who were already under the impression that all would be ok.
Having spent a few days researching and prototyping, it was clear that their laundry list of demands was impossible. I told them in plenty of time, providing evidence with Virtual Machines, using their "golden images". The website looked clunky, the database loader crashed the entire machine, the JavaScript flat-out refused to work.
Needless to say, they weren't happy. I was ordered to fix the issue, or "my ass is out on the street".
Spending every waking moment outside of work, I build something that, still to this day, I am insanely proud of. The Database was built robust; built to British and German security standards around Information Security. The Password management system was NUKE-proof (I calculated it would take until the Sun died to crack a single password), and managed to get the Database to load into the page flawlessly, using "pagination", the same technology Amazon uses to slide through pages, and AJAX (not important; my fellow devs will know). I managed to get the project completed a DAY before the deadline. Gave the customer a deadline, and plugged their live data into it. Everything worked fine, BUT, their DB had multiple duplicate records, with no way to filter through them. I told them that I could fix this issue with a 100% success rate, and would build dupe-protection into the software (it was easy); without losing pertinent information. The SQL script was dirty, but functional.
Shortly after completing the project, I was told it was "too slow". Now bare in mind; the longest action took 0.0023 of a second; EVEN ON XP. Never the less, I built it faster, giving benchmarking data for the before and after (only 0.0001 of a seconds improvement).
Shortly after, I was told to pack my "shit", as I'd failed my peer review.
The nightmare continues
Because I'd built the software outside of work, on my own time, on my own devices; they had no rights over it, as the only version they saw were the second-to-last, and final commits from my private github.
Shortly after leaving, I'm served papers, summoning me to court for "corporate espionage". Wait, WHAT?
Turned up to court with all relevant documents, a copy of my development system on an ISO for evidence, and a court-issued solicitor. Their claim, was that I'd purposely engineered the application to be insecure, causing their client to be hacked, losing an inordinate amount of money. They presented the source code as "evidence", citing that the password functionality for the management interface was using MD5 (you can google an MD5 hash and find out what it is; see here: https://md5.gromweb.com/?md5=1f3870be274f6c49b3e31a0c6728957f
I show the court the source code I have from the final version (which had only been altered once within work premises to improve speed and provide benchmarking information). They then accuse me of theft, despite showing IP-trace information from Git, the commit hashes from Github, correlating with my PC, and all the time logs from editing and committing (all out of hours).
The Aftermath
To cut an already long story short; I got a payout for defamation of character and time wasted, they paid all the court costs, and was let go with the summons removed from my record.
The story doesn't end there though...
Currently, I am doing a Degree in Information Security, and working for a Managed Service Provider for security products and monitoring. I was asked to do a site visit and perform;
Full "Black Box" Penetration Test (I'm given no knowledge on the network to be attacked, and can use almost any means to gain access)
Full Compliance test for PCI DSS (Payment card industry for Debit/Credit payments)
GDPR (Information storage and management)
ISO 27001 FULL audit
All in all, this is a very highly paid job. Sat in the car park with a laptop, I gained FULL ADMIN ACCESS within about 20 minutes, cloned the access cards to my phone over the air, and locked their systems down (all within the contract). Leaving for the day, I compile a report with pure glee. Their contract with us stipulates that the analyst on site would remain to remediate any and all issues, would have total jurisdiction over the network whilst on job, and would return 6 months later for further assessment and remedy and and all issues persistent or new.
The report put the company on blast; outlining every single fault, every blind spot, and provided evidence of previous compromise. The total cost of repairs was more than the company was willing to pay (they were able, I saw the finances after all). The company went into liquidation, but not before trying to have me fired for having a prior vendetta. The legal team for my current employers not-so-politely tore them to shreds, suing for defamation of character (sounds familiar right?), forcing them to liquidate even more assets than they intended; ultimately costing them their second home.
TL;DR: Got a job, got told I was fired after doing an exemplary job; then had the company liquidated due to MANY flaws when working for their security contractors.
submitted by /u/BenignReaver [link] [comments] ****** (source) story by (/u/BenignReaver)
315 notes
·
View notes
Photo

How to Build and Deploy a Web App With Buddy
Moving code from development to production doesn't have to be as error-prone and time-consuming as it often is. By using Buddy, a continuous integration and delivery tool that doubles up as a powerful automation platform, you can automate significant portions of your development workflow, including all your builds, tests, and deployments.
Unlike many other CI/CD tools, Buddy has a pleasant and intuitive user interface with a gentle learning curve. It also offers a large number of well-tested actions that help you perform common tasks such as compiling sources and transferring files.
In this tutorial, I'll show you how you can use Buddy to build, test, and deploy a Node.js app.
Prerequisites
To be able to follow along, you must have the following installed on your development server:
Node.js 10.16.3 or higher
MongoDB 4.0.10 or higher
Git 2.7.4 or higher
1. Setting Up a Node.js App
Before you dive into Buddy, of course, you'll need a web app you can build and deploy. If you have one already, feel free to skip to the next step.
If you don't have a Node.js app you can experiment with, you can create one quickly using a starter template. Using the popular Hackathon starter template is a good idea because it has all the characteristics of a typical Node.js app.
Fork the template on GitHub and use git to download the fork to your development environment.
git clone https://github.com/hathi11/hackathon-starter.git
It's worth noting that Buddy is used with a Git repository. It supports repositories hosted on GitHub, BitBucket, and other such popular Git hosts. Buddy also has a built-in Git hosting solution or you can just as easily use Buddy with your own private Git servers.
Once the clone's complete, use npm to install all the dependencies of the web app.
cd hackathon-starter/ npm install
At this point, you can run the app locally and explore it using your browser.
node app.js
Here's what the web app looks like:
2. Creating a Buddy Project
If you don't have a Buddy account already, now is a good time to create one. Buddy offers two premium tiers and a free tier, all of which are cloud based. The free tier, which gives you 1 GB of RAM and 2 virtual CPUs, will suffice for now.
Once you're logged in to your Buddy account, press the Create new project button to get started.
When prompted to select a Git hosting provider, choose GitHub and give Buddy access to your GitHub repositories.
You should now be able to see all your GitHub repositories on Buddy. Click on the hackathon-starter repository to start creating automations for it.
Note that Buddy automatically recognizes our Node.js app as an Express application. It's because our starter template uses the Express web app framework.
3. Creating a Pipeline
On Buddy, a pipeline is what allows you to orchestrate and run all your tasks. Whenever you need to automate something with Buddy, you either create a new pipeline for it or add it to an existing pipeline.
Click on the Add a new pipeline button to start creating your first pipeline. In the form shown next, give a name to the pipeline and choose On push as the trigger mode. As you may have guessed, choosing this mode means that the pipeline is executed as soon as you push your commits to GitHub.
The next step is to add actions to your pipeline. To help you get started, Buddy intelligently generates a list of actions that are most relevant to your project.
For now, choose the Node.js action, which loads a Docker container that has Node.js installed on it. We'll be using this action to build our web app and run all its tests. So, on the next screen, go ahead and type in the following commands:
npm install npm test
4. Attaching a Service
Our web app uses MongoDB as its database. If it fails to establish a connection to a MongoDB server on startup, it will exit with an error. Therefore, our Docker container on Buddy must have access to a MongoDB server.
Buddy allows you to easily attach a wide variety of databases and other services to its Docker containers. To attach a MongoDB server, switch to the Services tab and select MongoDB. In the form shown next, you'll be able to specify details such as the hostname, port, and MongoDB version you prefer.
Make a note of the details you enter and press the Save this action button.
Next, you must configure the web app to use the URI of Buddy's MongoDB server. To do so, you can either change the value of the MONGODB_URI field in the .env.example file, or you can use an environment variable on Buddy. For now, let's go ahead with the latter option.
So switch to the Variables tab and press the Add a new variable button. In the dialog that pops up, set the Key field to MONGODB_URI and the Value field to a valid MongoDB connection string that's based on the hostname you chose earlier. Then press the Create variable button.
The official documentation has a lot more information about using environment variables in a Buddy pipeline.
5. Running the Pipeline
Our pipeline is already runnable, even though it has only one action. To run it, press the Run pipeline button.
You will now be taken to a screen where you can monitor the progress of the pipeline in real time. Furthermore, you can press any of the Logs buttons (there's one for each action in the pipeline) to take a closer look at the actual output of the commands that are being executed.
You can, of course, also run the pipeline by pushing a commit to your GitHub repository. I suggest you make a few changes to the web app, such as changing its header by modifying the views/partials/header.pug file, and then run the following commands:
git add . git commit -m "changed the header" git push origin master
When the last command has finished, you should be able to see a new execution of the pipeline start automatically.
6. Moving Files
When a build is successful and all the tests have passed, you'd usually want to move your code to production. Buddy has predefined actions that help you securely transfer files to several popular hosting solutions, such as the Google Cloud Platform, DigitalOcean, and Amazon Web Services. Furthermore, if you prefer using your own private server that runs SFTP or FTP, Buddy can directly use those protocols too.
In this tutorial, we'll be using a Google Compute Engine instance, which is nothing but a virtual machine hosted on Google's cloud, as our production server. So switch to the Actions tab of the pipeline and press the + button shown below the Build and test action to add a new action.
On the next screen, scroll down to the Google Cloud Platform section and select the Compute Engine option.
In the form that pops up, you must specify the IP address of your VM. Additionally, to allow Buddy to connect to the VM, you must provide a username and choose an authentication mode.
The easiest authentication mode in my opinion is Buddy's SSH key. When you choose this mode, Buddy will display an RSA public key that you can simply add to your VM's list of authorized keys.
To make sure that the credentials you entered are valid, you can now press the Test action button. If there are no errors, you should see a test log that looks like this:
Next, choose GitHub repository as the source of the files and use the Remote path field to specify the destination directory on the Google Cloud VM. The Browse button lets you browse through the filesystem of the VM and select the right directory.
Finally, press the Add this action button.
7. Using SSH
Once you've copied the code to your production server, you must again build and install all its dependencies there. You must also restart the web app for the code changes to take effect. To perform such varied tasks, you'll need a shell. The SSH action gives you one, so add it as the last action of your pipeline.
In the form that pops up, you must again specify your VM's IP address and login credentials. Then, you can type in the commands you want to run. Here's a quick way to install the dependencies and restart the Node.js server:
pkill -HUP node #stop node server cd my_project npm install #install dependencies export MONGODB_URI= nohup node app.js > /dev/null 2>&1 & #start node server
As shown in the Bash code above, you must reset the MONGODB_URI environment variable. This is to make sure that your production server connects to its own MongoDB instance, instead of Buddy's MongoDB service.
Press the Add this action button again to update the pipeline.
At this point, the pipeline has three actions that run sequentially. It should look like this:
Press the Run pipeline button to start it. If there are no errors, it should take Buddy only a minute or two to build, test, and deploy your Node.js web app to your Google Cloud VM.
Conclusion
Being able to instantly publish new features, bug fixes, and enhancements to your web apps gives you a definite edge over your competition. In this tutorial, you learned how to use Buddy's pipelines, predefined actions, and attachable services to automate and speed up common tasks such as building, testing, and deploying Node.js applications.
There's a lot more the Buddy platform can do. To learn more about it, do refer to its extensive documentation.
by Ashraff Hathibelagal via Envato Tuts+ Code https://ift.tt/33rH96G
1 note
·
View note
Text
Judgement day: How I tried to automate Marketing and PR with an Instagram bot
amzn_assoc_ad_type = "banner"; amzn_assoc_marketplace = "amazon"; amzn_assoc_region = "US"; amzn_assoc_placement = "assoc_banner_placement_default"; amzn_assoc_campaigns = "amzn_vicc_cloudcam_1017"; amzn_assoc_banner_type = "category"; amzn_assoc_isresponsive = "true"; amzn_assoc_banner_id = "1J0CHGJT75D586M66602"; amzn_assoc_tracking_id = "kraljevicn1-20"; amzn_assoc_linkid = "c122cc4768b349b4aab7d3099b74ea1c";
Its been a long time since my last tutorial. Most of my free time now goes into app development for the Passvult App and a few others.
While this is awesome and rewarding its taken some time way from this blog which I am trying to get back into. Lets not be naive Marketing and PR play a big part in getting people to visit your blog and download your app and in some cases it may be more so a factor than the quality of what your are doing itself especially when you are starting out.
To solve this problem I tried to apply some of my technical knowhow to accomplish some of the marketing and promotion for this blog and some of my other ventures so I could spend some more time writing for this blog. To do this I grabbed some bot code from Github and jumped straight in.
The Bot / Code
After doing some research at OpenSource or at least freely available bot code I stumbled across instabot.py This is by far the best bot available for setting up some kind of automated instagram presence. Its easy to setup and use and gives you some decent customisation options, if you know your python its also easy to extend if you are that way inclined.
Originally i had this bit running on AWS, due to costs of running this on a t2.micro ec2 instance I eventually moved this to a raspberry pi that sits on my desk for simplicity and cost hence all the setup follows a debian/ubuntu like setup process.
Setup
Prerequisites
To get the bot up and running you should run the following commands:
$ sudo apt-get git -y $ sudo apt-get python -y $ git clone https://github.com/instabot-py/instabot.py $ cd instabot.py $ sudo pip install -r requirements.txt
Modifications to make so it runs on your system
Next you have to make some mods so that the code will run on your system. you will need to create a script that is your bot the quickest way to do this is to copy the example.py script and modify it for your bot.
$ cp example.py mybot.py
Next you will need to modify the section that looks like this to house your bots username / credentials but also the hashtags you want your bot to follow and like posts from:
bot = InstaBot('login', 'password', like_in_day=1000, media_max_like=50, media_min_like=5, tag_list=['like', 'follow', 'f4f'], max_like_for_one_tag=50, log_mod=1) bot.auto_mod()
Now your bots ready for running but if your like me you wont want to run it manually.
The driver script which runs your bot on cron
If your like me you wont ever want to run this manually so this next section describes how to setup a driver script thats triggered everyday by cron.
# Run the instagram bots once a day at a random time # Output to log now=$(date) echo "------------------------------------------" >> /home/boto/instabot.py/bot_log.log echo "Bots started at : $now" >> /home/boto/instabot.py/bot_log.log #Security Sleuth Bot - sleep for a random time sleep $(( ($RANDOM % 120)*60 + ($RANDOM % 60) )) # Exiting sleep process at now=$(date) echo "Exiting random sleep at : $now" >> /home/boto/instabot.py/bot_log.log echo "Triggering Security Sleuth bot at : $now" >> /home/boto/instabot.py/bot_log.log # Run bot python /home/boto/instabot.py/sleuth.py # Run completed at now=$(date) echo "Bot run completed at : $now" >> /home/boto/instabot.py/bot_log.log echo "------------------------------------------" >> /home/boto/instabot.py/bot_log.log
Running
Every day the script is run via cron off at about 5am my local time. as you can see above it will sleep for a random amount of time before liking a number of posts and following a number of accounts.
The bot has several modes - mine runs in the most basic which is like all posts in the hashtag range and follow everybody. you can setup some more complex behaviours like unfollowing people or unfollowing them if they don't follow you back etc etc. I wont delve into that in this post, head to the source code and grab the instructions there if you are interested.
Results
In the short time I had the bots running (roughly around 2 months) I managed to amass around 1000 Followers just simply by having this bot running with and probably posting less than a handful of things. But the deeper level of engagement I was looking for didn't happen hence I would go so far to say that this activity wasn't fruitful for new / emerging business PR.
This might be effective if your day job is posting photos on Instagram and you need to build up a large amount of followers so you can command better payments.
Conclusion
As always I hope you found this tutorial useful. Please let me know if you would like to see more bot or automation focused tutorials in the near future.
As always thanks for your support! Until next time,
The Security Sleuth
#tutorial#passvult#app development#PR#marketing#GitHub#Bot#Code#OpenSource#instabot.py#instagram#AWS#Raspberry Pi#python#.py#driver#cron#linux#ubuntu#debian#followers#automation#bot net
108 notes
·
View notes
Text
How To make use of Tutu App?
Although different in functions, each are closely similar to each other. However, there is no such thing as a such file like tutu helper vip android that may work on both the platform concurrently. Read a number of the distinctive features of Tutu helper free Android file. The third-party app retailer is available in two options-free and VIP. It extensively supports widespread OS of Android and iOS, along with enablement with Pc. The app store permits the download of the most recent apps and updates on a regular basis. It supports the in-app integration whereas being the quickest downloader. Infinite and free access to widespread apps and games. These have been only a few highlighted options of tutuapp helper. Other than what has been given above, there’re many extra routine functions of tutu helper android App to make the most of and get essentially the most out of it. Tutuapp latest version has lately give you further further features to supply its users. WhatsApp Plus is now also available on the tutuapp retailer. From the cateogry of casual video games, My Talking Tom apk is quite fashionable and engrossing. You possibly can watch virtually every movie. This app has obtained a huge library from the newest movies to G(outdated) Movies. Movies and Tv Shows. Also, you'll be able to watch all of the Tv Series too. This app is superb, quick and User-Friendly and last but not the least don’t forget its tiny. App has inbuilt Updater which retains it updated at all times. Please Sign up to Movie HD together with your Google Account on Android Devices. You will need a Movie HD Activation Code just for Fire Tv and Android Tv to continue Watching Movies with this app or you will get a No Connection Error. How to install Movie HD Apk on Android Devices? Download the Apk File from the above and AMPlayer Apk. Run the app and start Streaming. Follow the steps beneath to run Movie HD Apk on Amazon Fire Stick and Fire Tv. The trick shared earlier in this put up was lengthy and robust so I have updated it with a shorter and efficient manner. Select this feature if you wish to root your android system. It's going to install an app in your android telephone referred to as as SuperSU which manages all Su permissions to different root apps. Once, you could have chosen this selection after which there are following potentialities. Success: Congratulations, your android phone is rooted successfully. Restart it now and Open SuperSU and click on on Update Binaries (in the event you get any popup). Enjoy, your rooted android gadget now. Now, you can get pleasure from all android apps like fortunate patcher which is able to work on rooted gadgets only. Failed: That exploit was unable to root your android gadget. Try every other exploit (if obtainable). App Hanged or Crashed? Close app and Re-attempt that exploit now. There are many advantages of unrooting the android phone. Select this selection if you wish to unroot your machine. This option will delete SuperSU app and it’s binaries. To unroot your machine, follow under steps. 1. Select unroot from the drop down menu. 2. Select any of accessible exploit. 3. It would delete su binaries and su app too. This selection is meant for superior users solely. It's not beneficial to make use of this option. After deciding on any of out there exploits, if you're getting any error with a quantity lower than or equal to 9 then your telephone can’t be rooted by way of Framaroot. If you bought error 10 then give a try to Framaroot 1.5.3 APK. Q1. Framaroot not engaged on XYZ system. Ans. You may give a attempt to other exploits. You possibly can try different exploits or every other APK. So it was all about Framaroot app. In case you are having any downside in downloading framaroot apk or set up it or in rooting your android telephone. Be happy to remark below. You could already know that your IP deal with is exposed to Government Agencies and ISP. IPVanish VPN is most trusted VPN service and its Military Grade Encryption ensures your internet privateness with out logging your exercise over the internet. Moreover, with one IPVanish subscribtion, you possibly can protect 10 Devices Simultaneously. The Snooping Hackers, trackers and Internet Provider will never be ready to trace your web activity. Download HereCyberflix Tv apk is clone of Terrarium Tv which was fairly standard app but discontinued by the developer. Not to fret, Cyberflix Tv is again with the new avatar of Terrarium Tv. Cyberflix Tv also scraps the video links that are already accessible on the web. Cyberflix Tv don't host any media file on their servers. The video source is unknown and they are positively not secure to your on-line privateness. Don’t panic, a good VPN will take care of that for you. With the most recent version of the applying the consumer may create number of download lists of their favorite tracks for offline functions. The variety of downloads from spotify nod which were first restricted to few, now has no limit. Creating playlists has also been given choices of sharing and discussions. The latest model has all of the options have been unlocked which earlier than were not obtainable without spending a dime customers. Options like unlimited shuffling from top to backside, quick and advanced searches in hacked spotify are the plus level. While apkview.com of repeats which was before limit to few has also been rearranged. Ads which were probably the most irritating part of free applications, which popup after ever minute or change in menu have been the users biggest points. But the most recent model of spotify apk download is completely freed from unwanted ads popups with an anti-advert characteristic which is also unlocked in contrast to others. The excellent and clear sound quality with a number of sound choices have been added with fully controllable sound qualities option from Normal, High to excessive high quality of 320 Kbps.
1 note
·
View note
Text
DubMaster AI Review – Dub and Translate Any Video Automatically Boost Your Business
Welcome to my DubMaster AI Review. This DubMaster AI review is based on user feedback and covers features, upgrades, pricing, demo, bonus, how it can help you. AI App Powered by Amazon’s Alexa AI Dubs & Translates Any Video Like Educational Videos, Marketing Videos, YT Videos, Webinars & Much More In 80+ Different Languages With Automatic Lip-Sync And Human-Like Voices In Less Than 60 Seconds!
Imagine, Video content is a popular medium in the current generation since there is almost no site or social platform devoid of it. From YouTube channels to social media sites and from business channels to corporate websites, video has emerged as a potent medium for interaction, knowledge sharing and marketing. However, there is one issue that appears quite constantly when using videos as the primary form of content: different languages. The opportunity to broadcast video content to a wider audience is fundamental to growth and interactivity, and this is where DubMaster AI comes into play However, DubMaster AI is advertised as the world’s first premiere video translator application that enables clients to minimize language barriers due to its accurate video translation feature. So, don’t miss out on this limited-time discount.
What Is DubMaster AI?
DubMaster AI is a new video translator service that uses artificial intelligence to translate the captions in a video into multiple languages. They still apply latest Artificial Intelligence and Machine Learning to offer live dubbing and voice over translation on videos. This makes it possible for content creators, marketers and educators to share with the entire global audience translating it into different languages and formats not being complicated and costly as it used to be.

DubMaster AI targets businesses, bloggers, and content creators who look for the opportunity to remove the language barrier. The platform is meant to support various video formats for translation, and due to the use of the AI engine, it means that translations do not take so much time, but also essential translations do not contain distortions and unmotivated errors as far as the context is concerned.
DubMaster AI Review: Overview
Product Creator: Akshat Gupta
Product Name: DubMaster AI
Launch Date: 2024-Oct-05
Launch Time: 11:00 EDT
Front-End Price: $17 (One-time payment)
Official Website: Click Here To Visit Official Salespage
Product Type: Tools And Software
Support: Effective Response
Discount: Get The Best Discount Right Here!
Recommended: Highly Recommended
Bonuses: YES, Huge Bonuses
Skill Level Required: All Levels
Discount Coupon: Use Code “DUBMAS5” To Get $5 OFF!
Refund: YES, 30 Days Money-Back Guarantee
>>> Click Here to Visit DubMaster AI and Get Access Now <<<
DubMaster AI Review: About Authors
At the helm of DubMaster AI is Akshat Gupta, a visionary driving innovation in AI technology throughout 2024. Gupta brings his wealth of expertise to the forefront, dedicating himself to developing pioneering solutions that simplify and streamline dub videos for users globally.
Recognized as a prominent leader in the field, Gupta continually inspires and empowers others to leverage the potential of AI in achieving their goals and maximizing their online capabilities.
He has earned his reputation through the creation of numerous products such as AI Rider, AI AppMaker, Dream AI, AI Employees, KidTales PLR, AI DeepSongs, SiteFlow AI, CreativeAI 2.0, AI GameZone, AI VideoBooks, AI AppMaker, AI VideoSong, VoiceGPT AI, ExplainerVideoz, FlipBooks, MazeMaker, eBookMaker, and many others.
DubMaster AI Review: Key Features of DubMaster AI
Seamlessly Localize Content To Ensure Global Accessibility With Advanced Lip-sync Technology
Generate realistic AI voices or clone your voice in the voiceover editor.
Translate ANY Video In Over 185+ Different Languages.
Immediately Dub from Any Source: Just Put The URL & It Will Dub It Instantly.
No Special Skills or Experience Required
Break Language Barriers With AI-Powered Instant Video Translations Using DubMaster AI
Translate Full-Length Recordings in Minutes Without ANY Technical Skills.
Zero Learning Curve: Anyone Can Dub Videos, Easily On The Go.
Based on script transcription, DubMaster AI enables you to add auto subtitles to the video.
Export Videos in any format, size, or resolution for any platform.
Step By Step Training Included
DubMaster AI Review: How Does It Work?
Finally, Achieve the Impossible In Just 3 EASY Steps and Start Translating & Dubbing Videos in ANY Language within Minutes While Taking Your Business to the Billions of People in Their Preferred Language
Step #1: Upload The Video
Grab A Copy Of DubMaster AI & Upload or Paste The URL of Your Video
Stwp #2: Choose Language
Select The Language In Which You Want To Dub The Video
Step #3: Dub & Profit
Start Profiting By Starting Your Very Own Video Dubbing AI Agency While Charging $100-500 Per Video Translation.
>>> Click Here to Visit DubMaster AI and Get Access Now <<<
DubMaster AI Review: Benefits of DubMaster AI
World’s First Human-Sounding & Emotion-Based Video Dubbing AI App
Translate & Dub Your Videos In Real-Time In Less Than 2 Minutes
Dub Your Videos In Over 80+ Different Languages At a Lightning Speed
ZERO Learning Curve Required: Just Upload the Video, Choose the Language & Done
Upload & Dub Hours Long Videos or Even BIG Movies within Minutes
Built-In Automatic Lip-Sync Feature Dubs Videos with Perfectly & Naturally Aligned Lip Moments
Translate Your Videos With Auto-Subtitles, Motions & With 100% Accuracy
Automatically Dub Your Videos Just with the URL or Upload ANY File Format Like mp4, Mov, WebM
Dub ANY Type of video like Educational Videos, Marketing Videos, and YouTube Videos & Much More
Reach to the Global Audience & 10X Your Business Sales & Profits
World-Class Video Editor: Fully Customize Your Translated Videos With Our DFY Realistic Voice-Overs & AI Avatar Library
Built-In AI Content Modification: Adust Tone, Voices, Slang & Pitch of Your Videos in a Few Clicks
Export & Download Your Videos in Different File Formats like .mp4, .mov, .wav & more
Fire All Your Expensive Video Translation Tools
Say Goodbye To Monthly Fees
Commercial License Included -Start Your Very Own AI Video Translation Agency
Newbie Friendly, Easy-To-Use Dashboard
Iron-Clad 30-Day Money-Back Guarantee
Verify Users Say About DubMaster AI
DubMaster AI Review: Who Should Use It?
Product Owners
Affiliate Marketers
Website Owners
Social Media Marketers
Small Business Owners
E-com Store Owners
Coaches/Trainers
Service Providers
Influencers
Book Writers
Video Ad Creators
Video Marketers
Product Review Marketers
And Many Others
DubMaster AI Review: OTO’s And Pricing
Add My Bundle Coupon Code “DUBADMIN″ – For 30% Off Any Funnel OTO Below
Front End Price: DubMaster AI ($17)
OTO1: Unlimited ($35 – $37)
OTO2: DFY ($67)
OTO3: AI Avatar Video Edition ($47)
OTO4: AI Short Maker ($67)
OTO5: Automation ($37)
OTO6: DFY Traffic + Secret Platform ($47)
OTO7: DFY Profit Sites ($97)
OTO8: Agency ($97)
OTO9: Reseller ($97)
OTO10: Whitelabel ($197)
>>> Click Here to Visit DubMaster AI and Get Access Now <<<
My Own Customized Exclusive VIP Bonus Bundle
***How To Claim These Bonuses***
Step #1:
Complete your purchase of the DubMaster AI: My Special Unique Bonus Bundle will be visible on your access page as an Affiliate Bonus Button on WarriorPlus immediately after purchase. And before ending my honest DubMaster AI Review, I told you that I would give you my very own VIP Bonus PFTSES formula for Free.
Step #2:
Send the proof of purchase to my e-mail “[email protected]” (Then I’ll manually Deliver it for you in 24 HOURS).
DubMaster AI Review: Demo Video
Just Watch DubMaster AI Down Below To Get All The Details:
DubMaster AI Review: Money Back Guarantee
You’re In Safe Hands With Our 100% Risk-FREE, Iron-Clad 30 Days Money Back Guarantee
The idea is that if you buy DubMaster AI and don’t feel like you’re receiving what you paid for, we don’t want your money. We’re on a quest to produce a high-quality product with ZERO unsatisfied consumers. And if we fail in any manner, we do not deserve your money. If we don’t fulfill your expectations, please let us know within 30 days for a complete refund. Heck, as a kind gesture, we’ll even offer you some additional software to help you grow your company and sales like never before. So, either way, you win.
>>> Click Here to Visit DubMaster AI and Get Access Now <<<
DubMaster AI Review: Pros and Cons
Pros
Highly accurate translations and at the same time, the context.
Over 100 languages supported meaning that you can connect better with your diverse international audience.
The internal use of the system is intuitive, and the navigation through its interface can be easy.
Notable time-saving in that translation and dubbing functions could be fully automated.
Flexible voice choices retain the author’s tone and include the same dialect and accent.
The fact that is stored in the cloud makes it easy to access from any device.
Cons:
You need internet for using this product.
No issues reported, it works perfectly!
Frequently Asked Questions (FAQ’s)
Q. What exactly is DubMaster AI?
The World’s 1st Premier Video Translator App That Dubs ANY Video In Over 80+ Different Languages With Automatic Lip-Sync & Human-Like Voice Overs In Real-Time In Less Than 60 Seconds.
Q. Do I need some prior skills or experience to get started?
DubMaster AI is 100% newbie-friendly with an easy-to-use dashboard.
Q. What happens if I don’t see results?
We’ve got you covered. If you don’t see your desired results with DubMaster AI just let us know within the next 30 days and we’ll refund you every penny.
Q. What if I get confused along the way?
Don’t worry we have exclusive detailed video training for you that shows all the required steps.
Q. What if I get confused along the way?
Don’t worry we have exclusive detailed video training for you that shows all the required steps.
Q. Is This Compatible On Both PC, Mac, Android And iOS?
It works on any device.
Q. How Do I Lock-In My Discount?
Click the button below to get the DubMaster AI at the lowest price.
DubMaster AI Review: My Recommendation
DubMaster AI is the perfect solution for businesses and content creators that wants to break the barriers and reach out to audience all over the world. It has more efficient AI capabilities, supports many languages – and is easy to use. However, it’s important to know what this tool is not capable of, and perform a cost-benefit analysis on your case before proceeding. Thus, engaging DubMaster AI, you can expand your video content for various target geographies so that your content would elicit the intended engagement and result in achieving your business objectives.
>>> Click Here to Visit DubMaster AI and Get Access Now <<<
Check Out My Previous Reviews: AI Dady Review, VoizHub AI Review, High Ticket Profit System Review, Vocal Vibes AI Review. and ZenBuildr Review.
Thank for reading my DubMaster AI Review till the end. Hope it will help you to make purchase decision perfectly.
Disclaimer: This review is based on available information and user experiences. Individual results may vary. It’s recommended to conduct thorough research and due diligence before making any investment decisions.
Note: This is a paid software, and the one-time price is $17 .
#DubMasterAI#DubMasterAIreview#DubMasterAIfeatures#DubMasterAIworks#WhatisDubMasterAI#buyDubMasterAI#DubMasterAIprice#DubMasterAIdiscount#DubMasterAIoto#GetDubMasterAI#DubMasterAIbenefits#DubMasterAIbonus#DubMasterAIsoftware#DubMasterAIApp#DubMasterAIFunnels#marketingprofitmedia#DubMasterAIUpsell#DubMasterAIinfo#PurchaseDubMasterAI#DubMasterAIexample#DubMasterAIworthgorbuying#DubMasterAIreviews#DubMasterAIreviewwalkthrough#DubMasterAIreviewbonus#DubMasterAIreviewWarriorPlus#Software#AISoftware#AIApp#AITool#Affiliate
0 notes
Text
Upgrade your ecommerce business scopes by getting your own Amazon clone

In the ever-growing ecommerce market, with its magnanimous increase of global revenue in each quarter, there are constantly new players that look to sway the market to their side. Each new competitor looks for a different way to get users hooked on their business. This never-ending thirst for users’ attention is only getting bigger, with more people avidly shopping on their mobile devices on ecommerce apps like Amazon. The ecommerce app market has a sure stronghold in mobile devices as almost 72% of ecommerce share will come from mobile users. This is the perfect time to invest in an ecommerce app like amazon.
What is amazon?
Amazon is a global ecommerce platform connecting brands and independent stores to customers through its shopping portal. Users can browse through an endless category of stores and products, and Amazon will deliver it to the customers through their delivery system. It is the world’s largest ecommerce company today, nicknamed the “King of Ecommerce”.
But what can the app running the biggest ecommerce chain do? The answer is less than this Amazon clone designed to topple the original app.
Features of the Amazon clone
Multilingual support
The app comes ready with support for tens of languages, for users of different countries, states, or dialects can comfortably use the app without any difficulties.
Multiple payment methods
The more options available to pay, the safer and less hassle each transaction will be. Cashless payments are one of the most popular and safest modes of payment of 2021.
Multi-currency support
There are multiple currencies available in a continent, and what better way to cover more users than to include multiple currency payment with integrated online conversions.
Advanced search bar
With more user targeted algorithms, intelligent filters and searches, results are spot on as it eliminates the number of random products occurring in the searches.
Real-time tracking
Users can track their products real-time as soon as it is shipped. There are also multiple options to intercept and collect the order ahead of time if necessary.
With that being said,
Getting an app for business can be one of the most beneficial investments. Buying an Amazon clone app that is completely customised for your business is now easy. Your business is one step away from being the best version of itself!
Take that step now by clicking this link: https://www.appdupe.com/amazon-clone
#Amazon like app development#Best Amazon clone script#Amazon clone source code#amazon clone android#Stellar Ecommerce App Solution
1 note
·
View note
Text
Step-by-Step Guide: Coding in React.js with the Amazon Clone Codebase
React.js is a powerful JavaScript library for building user interfaces. In this step-by-step guide, we will walk through the process of coding in React.js using the codebase provided at [GitHub — KevinRoozrokh/Amazon Clone](https://github.com/KevinRoozrokh/amazon-clone). By following these steps, you will be able to set up the project, understand the code structure, and make modifications to create your own Amazon-like e-commerce application.
Prerequisites: Before we begin, ensure that you have the following prerequisites installed on your system: - Node.js (version 12.0 or higher) - Git (for cloning the repository) - A code editor of your choice (e.g., Visual Studio Code)
Step 1: Clone the Repository
Open your terminal or command prompt.
Navigate to the directory where you want to clone the repository.
Run the following command to clone the repository: ``` git clone https://github.com/KevinRoozrokh/amazon-clone.git ```
Step 2: Install Dependencies
Change into the project directory using the command: ``` cd amazon-clone ```
Install the required dependencies by running the following command: ``` npm install ```
Step 3: Configure Firebase
Create a new Firebase project at [Firebase Console](https://console.firebase.google.com/).
Go to the project settings and find the Firebase SDK configuration.
Copy the configuration object.
Create a new file named `.env` in the project’s root directory.
Inside the `.env` file, paste the Firebase configuration object as follows: ``` REACT_APP_API_KEY= REACT_APP_AUTH_DOMAIN= REACT_APP_PROJECT_ID= REACT_APP_STORAGE_BUCKET= REACT_APP_MESSAGING_SENDER_ID= REACT_APP_APP_ID= ``` Replace ``, ``, and other values with your Firebase project’s configuration.
Step 4: Start the Development Server
Run the following command to start the development server: ``` npm start ```
The application will open in your default web browser at `http://localhost:3000`.
Step 5: Understand the Code Structure
Open the project in your code editor.
Explore the codebase to understand its structure and key files, such as: — `src` directory: Contains the main source code files. — `src/components`: Contains reusable components used throughout the application. — `src/pages`: Contains individual pages of the application, such as Home, Checkout, Login, etc. — `src/redux`: Contains Redux-related files for state management. — `src/firebase`: Contains Firebase-related configuration and utility functions.
Step 6: Make Modifications Now that you have the codebase set up and understand its structure, you can start making modifications to customize the Amazon clone according to your needs. Some areas to consider modifying include: - Adding new components or pages - Modifying the styling using CSS or a UI library - Integrating additional features or APIs
Step 7: Deploy the Application (Optional) If you want to deploy your modified application, you can follow these steps:
Build the optimized version of the application by running the command: ``` npm run build ```
Deploy the application to a hosting platform of your choice. Some popular options include Firebase Hosting, Netlify, or GitHub Pages.
Conclusion:
By following this step-by-step guide, you have successfully set up the Amazon clone codebase in React.js and gained an understanding of its structure. You can now start making modifications and customizations to create your own e-commerce application. Remember to explore the React.js documentation and resources to further enhance your skills and expand the functionality of your application. Happy coding!
Written by Kevin K. Roozrokh Follow me on the socials: https://linktr.ee/kevin_roozrokh Portfolio: https://KevinRoozrokh.github.io Hire me on Upwork: https://upwork.com/freelancers/~01cb1ed2c221f3efd6?viewMode=1
#react#reactjs#software testing#cloud computing#reactjs developers#computerscience#softwaredevelopmentcompany#amazon#github#open source#software#computing#information technology
0 notes
Text
youtube
10 Fun Websites to Cure Your Boredom Online! 2023 https://www.youtube.com/watch?v=90jykY63Ssg If you’re bored or just need a break from the mundane tasks in life, there are tons of cool websites that will help you to pass the time. In this video, I will show you 10 fun websites to help you cure your boredom online. Subscribe! ▶ https://www.youtube.com/@BrettInTech Share This Video ▶ https://youtu.be/90jykY63Ssg 10 Fun Websites That Will Cure Your Boredom https://youtu.be/MXJKcwrOpmc 20 Cool Websites to Visit When You’re Bored! https://youtu.be/GJwBSPxdYOM “Useful Websites” Playlist https://www.youtube.com/playlist?list=PLunpbmfrhFAUSPVZqT_-ApAq7x8K_IIBN MORE VIDEOS TO WATCH: o 10 Useful AI Tools You’ll Actually Want to Use - https://youtu.be/fLh0ZaLfPjk o 10 Insanely Useful Websites You Didn’t Know Existed! - https://youtu.be/raiK-_aPouo o 10 Amazon Prime Benefits You Might Not Be Using - https://youtu.be/K7mubx6Dbec o Top 10 Best Websites to Learn to Code - https://youtu.be/O3xoyImi35w o Top 10 Best Netflix Original Movies to Watch Now! - https://youtu.be/CdS0S9U7n4o 0:00 Intro 0:05 Compare Cultural Moments in Time 1:35 Jurassic Park Hacking Simulator 1:58 Comedic Blog Website 2:16 Invisible Cow Game 2:55 Trust Game 3:15 Strange Products 3:42 Multilingual Mini-Game 4:05 Test the Strength of Your Passwords 4:33 Asteroids Clone Game 4:52 Gift Yourself an Award 5:26 New Way to Interact with Books 5:52 60-Second Meditation Tool What Came First?: https://ift.tt/xXa3dmO Jurassic Systems: https://ift.tt/3XKQ0Jw Fail Blog: https://ift.tt/S4gtvlY Find the Invisible Cow: https://ift.tt/OZsEwJ7 The Evolution of Trust: https://ncase.me/trust/ Weird or Confusing: https://ift.tt/a8Jsw2c The Passive Aggressive Password Machine: https://trypap.com/ Weglot Like Magic: https://ift.tt/Ol2kDwe Asteroids Clone: https://ift.tt/cKpjTV9 Arbitrary Awards: https://ift.tt/f5azRKt Talk to Books: https://ift.tt/sThop2V Pixel Thoughts: https://ift.tt/NRDBr5s Twitter: https://twitter.com/BrettInTech Facebook: https://ift.tt/yXDZnUI Brett In Tech is a leading source for the technology that we use each day. Whether it’s discussing computer operating system tricks, the latest tips for your mobile phone, finding out about the newest gadgets, or letting you know about fun websites on the internet, Brett In Tech has boundless topics on technology for the astute YouTube viewer.
0 notes
Text
Wise install builder 8.1

#WISE INSTALL BUILDER 8.1 INSTALL#
#WISE INSTALL BUILDER 8.1 UPDATE#
#WISE INSTALL BUILDER 8.1 INSTALL#
Of packages and release them on an install media like a DVD or an USB Linux distributors provides their distribution based on a collection An appliance is needed to be registered with the Possible in such an environment because there is no physical access The classic way to install a machine is not
#WISE INSTALL BUILDER 8.1 UPDATE#
Image 6 KIWI Plugins 6.1 Building in a Self-Contained Environment 6.2 Building based on Containers 7 Concept and Workflow 7.1 Host Requirements To Build Images 7.2 Setting up Repositories 7.3 Adding and Removing Packages 7.4 Image Profiles 7.5 Adding Users 7.6 User Defined Scripts 7.7 The Runtime Configuration File 7.8 Customizing the Boot Process 7.9 Overview 7.10 Image Building Process 8 Image Description 8.1 Image Description Elements 8.2 Main Root 8.3 Image Identity 8.4 Image Preferences 8.5 Image Software Sources 8.6 Image Content Setup 8.7 Image Users 8.8 Image Namespace 8.9 Image Includes 9 Image Types 9.1 Image Results 9.2 Image Bundle Format 10 Building Images for Supported Types 10.1 Build an ISO Hybrid Live Image 10.2 Build a Virtual Disk Image 10.3 Build an Expandable Disk Image 10.4 Build a Container Image 10.5 Build a WSL Container Image 10.6 Build KIS Image (Kernel, Initrd, System) 11 Working with Images 11.1 Deploy ISO Image on an USB Stick 11.2 Deploy ISO Image as File on a FAT32 Formated USB Stick 11.3 Booting a Live ISO Images from Grub2 11.4 Image Description for Amazon EC2 11.5 Image Description for Microsoft Azure 11.6 Image Description for Google Compute Engine 11.7 Image Description for Vagrant 11.8 Image Description Encrypted Disk 11.9 Deploy and Run System in a RamDisk 11.10 Custom Disk Partitions 11.11 Custom Disk Volumes 11.12 Setting Up a Network Boot Server 11.13 Build PXE Root File System Image for the legacy netboot infrastructure 11.14 Booting a Root Filesystem from Network 11.15 Booting a Live ISO Image from Network 11.16 Setting Up YaST at First Boot 11.17 Add or Update the Fstab File 11.18 Building Images with Profiles 11.19 Building in the Open Build Service 11.20 Using SUSE Product ISO To Build 12 Contributing 12.1 Using KIWI NG in a Python Project 12.2 Plugin Architecture 12.3 Write Integration Tests for the Scripts 12.4 Extending KIWI NG with Custom Operations 12.5 The Basics 12.6 Fork the upstream repository 12.7 Create a local clone of the forked repository 12.8 Install Required Operating System Packages 12.9 Create a Python Virtual Development Environment 12.10 Running the Unit Tests 12.11 Create a Branch for each Feature or Bugfix 12.12 Coding Style 12.13 Additional Information 13 Python API 13.1 kiwi Package 13.2 kiwi.archive Package 13.3 Package 13.4 Package 13.5 Package 13.6 kiwi.bootloader Package 13.7 Package 13.8 kiwi.boot Package 13.9 kiwi.builder Package 13.10 ntainer Package 13.11 Package 13.12 kiwi.filesystem Package 13.13 kiwi.iso_tools Package 13.14 kiwi.package_manager Package 13.15 kiwi.partitioner Package 13.16 kiwi.repository Package 13.17 Package 13.18 Package 13.19 kiwi.solver Package 13.20 kiwi.storage Package 13.21 Package 13.22 Package 13.23 kiwi.system Package 13.24 kiwi.tasks package 13.25 kiwi.utils Package 13.26 kiwi.volume_manager PackageĬloud environments are managed through an API provided by the cloud Preface The Appliance Concept Use Cases Contact 1 Overview 1.1 Basic Workflow 1.2 Conceptual Overview 1.3 Terminology 1.4 System Requirements 2 Installation 2.1 Installation from OBS 2.2 Installation from Distribution Repositories 2.3 Example Appliance Descriptions 3 Quick Start 3.1 Before you start 3.2 Choose a First Image 3.3 Build your First Image 3.4 Run your Image 3.5 Tweak and Customize your Image 4 Working from the Command Line 4.1 kiwi-ng 4.2 kiwi-ng result list 4.3 kiwi-ng result bundle 4.4 kiwi-ng system prepare 4.5 kiwi-ng system update 4.6 kiwi-ng system build 4.7 kiwi-ng system create 4.8 kiwi-ng image resize 4.9 kiwi-ng image info 5 Troubleshooting 5.1 Build Host Constraints 5.2 Architectures 5.3 Host Security Settings Conflicts with KIWI 5.4 Incompatible Filesystem Settings on Host vs.
1 note
·
View note
Photo

Disney Considers Its Own Kind of Amazon Prime Membership
A bag demonstrated at the 2019 D23 Expo, which is accessible by customers of the official D23 Admirer Club. Image : ROBYN BECK/AFP ( Getty Photographs )
In David Mitchell’s 2004 book Cloud Atlas, (not the movie, intellect you) sections of the story that get location in a dystopian foreseeable future wherever characters refer to big industries as their most important manufacturer. Gas is not gas, its “Exon.” Likewise, movies are not movies, they’re “Disneys.” However there is no reference to on the internet buying, just one can suppose buying things on the world wide web would only be referred to as “ Amazon .” Properly, primarily based on these firms ever-trending towards user consolidation, you can guess who’s caught a whiff of that Amazon goldmine which is called “Prime.”
Disney is reportedly digging deep into an thought for its personal sort of distinctive membership program. In accordance to The Wall Avenue Journal , dependent on four nameless sources shut to the ongoing conversations, Disney executives have internally termed this initiative “Disney Prime” as an clear implication for what they count on this new membership service to entail. Primary memberships offer the speedy, free of charge shipping and delivery packages it’ s most known for, but also contains bargains at Total Food items and accessibility to Amazon Originals on Key Video.
The program reportedly has the support of Disney CEO Bob Chapek, and if all goes perfectly it could be available this year. The very first phase will apparently involve in-application commerce for the Disney+ streaming assistance, allowing for users to acquire merch by scanning QR codes though applying the application, which url to the on-line Disney shop.
Due to the fact Disney has its fingers on so a great deal of the most popular franchises all over, the media big is looking at how it can leverage that to incentivize much more people today to signal up to a membership. Subscribing to Disney’s new provider could allow for you less expensive tickets for their topic parks, cruises, or toys. The massive case in point WSJ used was an special toy version of the darksaber as witnessed on Star Wars: The Clone Wars and later The Mandalorian . The Star Wars: Galaxy’s Edge develop-a-lightsaber experience has proved particularly popular because it debuted in 2019, even although it expenditures above $200 per person for the opportunity to construct your very own “las er sword.” It’s uncomplicated to see why Disney execs believe they will get pretty a couple folks shelling out their funds just for the possibility to invest even far more revenue on toys.
Disney did not right away respond to Gizmodo’s request for comment, but Disney corporate spokesperson Kristina Schake instructed Deadline that “Disney is additional than a brand name, it is a life style, and we are checking out how to superior provide them across our quite a few touchpoints.” She extra “a membership software is just 1 of the thrilling thoughts being explored.”
G/O Media could get a commission
Extra 25% off
Jachs NY Labor Day Sale
Extra extra sales The entire Jachs NY site is on sale—but you can cash in on an extra 25% off pants and shorts. That means shorts are $19 and pants are $29.
The company did not give any indication about what kinds of prices they were looking at, how long a membership might last, or when these memberships could be on the table. Amazon Prime memberships go for $139 a year or $14.99 a month in the U.S. after a recent increase . Annual fees are anticipated to get pricier in the Uk and Europe .
Disney by now has a variety of exclusive subscription referred to as the D23 Enthusiast Club that offers access to events and merch as properly as a 3 12 months discounted sub to Disney+. Even though any new form of “Prime” membership would very likely be extra focused on the company’s wide vary of franchises relatively than the company’s main staple of animated films and cartoons.
This could shake things up for Disney+ and the company’s other streaming products and services as effectively. The corporation lately announced it was including a $7.99 ad-based mostly membership to the system, at the same time generating all other subscriber tiers on Disney+, ESPN+ and Hulu, with or devoid of advertisements, much more pricey overall beginning Dec. 8.
Disney is not the only significant conglomerate who has lastly witnessed just how massive an opportunity they are lacking out on not imitating Amazon Key. Previous month, Paramount+ and Walmart announced they would commence presenting a membership bundle, enabling buyers of the latter entry to Paramount’s advert-dependent membership tier at no added price tag.
https://socialwicked.com/disney-considers-its-own-kind-of-amazon-prime-membership/
0 notes